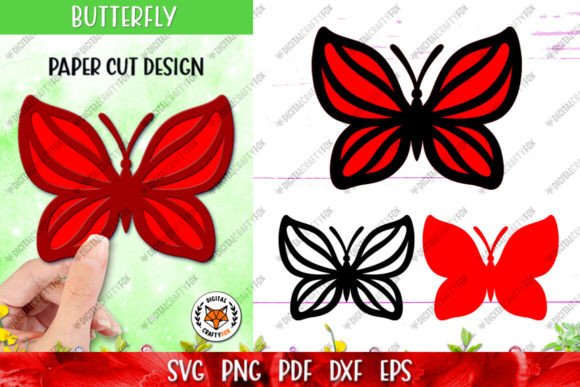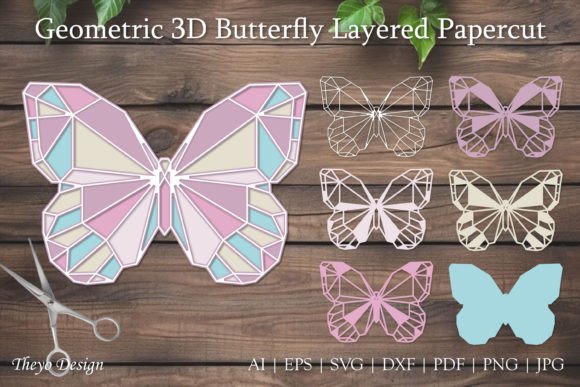
Geometric Butterfly 3D Layered Papercut: A Creative Tool for Craft Enthusiasts and Designers
The Geometric Butterfly 3D Layered Papercut is a digital cutting file set that allows artists, hobbyists, and professionals to bring intricate, layered butterfly designs into the real world with ease. Designed specifically for use with popular craft cutting machines like Silhouette, Cricut, and others, this product offers a blend of artistry and precision through multiple file formats. Whether you're working on a greeting card, home décor piece, or educational project, the Geometric Butterfly design adds a unique, eye-catching element that can elevate your creative output.
What Is a 3D Layered Papercut?
A 3D layered papercut is essentially a multi-layered paper cutout that creates depth and dimension when assembled. Unlike traditional papercuts, which are flat and single-layered, these designs involve several interlocking layers, each contributing to the overall visual complexity. The Geometric Butterfly 3D Layered Papercut takes this concept further by incorporating modern geometric patterns and shapes into its structure, making it both classic and contemporary in appeal.
This type of design works exceptionally well for those who enjoy blending traditional crafts with digital tools. The result is a visually striking piece that maintains the handcrafted charm while benefiting from the accuracy of machine-assisted cutting.
Understanding the File Formats Included
Your purchase includes a ZIP file containing various formats to suit different needs and software preferences:
- SVG (Scalable Vector Graphics): Ideal for most cutting machines, especially those running on Windows or Mac OS. SVG files are scalable without losing quality and are commonly used for custom designs.
- EPS (Encapsulated PostScript): Preferred by professional designers using Adobe Illustrator or similar vector-based programs. EPS ensures high-quality printing and precise scaling.
- PNG (Portable Network Graphics): Useful for previewing the design in raster format. PNGs often include transparent backgrounds, which help in positioning and assembling the layers accurately.
- PDF (Portable Document Format): Great for printing directly or as a guide when manually assembling the pieces. PDFs maintain layout integrity across devices.
- DXF (Drawing Exchange Format): Suited for more technical users, particularly those using CAD software or laser cutters.
- JPG (Joint Photographic Experts Group): Provides a standard image reference for the final look of the design, helpful during planning or sharing ideas online.
- AI (Adobe Illustrator): Perfect for editing and customizing the design in vector form. This format gives full control over colors, lines, and layering.
Having access to all these formats makes the Geometric Butterfly 3D Layered Papercut highly versatile. You can choose the one that best fits your workflow, whether you're preparing a digital mockup, sending a design to print, or adjusting the artwork for personalization.
Where Does This Design Fit in a Broader Creative Process?
Integrating the Geometric Butterfly 3D Layered Papercut into your projects can happen at various stages depending on your goals. For instance:
- Pre-Project Planning: Use the JPG or PNG versions to visualize how the butterfly will appear in your final product. This helps in aligning the design with your color scheme or theme before investing time in assembly.
- Digital Creation Phase: Import the SVG or AI file into your design software to adjust dimensions, colors, or add text. This is useful if you’re creating custom invitations, branding materials, or even packaging concepts.
- Cutting & Assembly: Once finalized, send the design to your cutting machine using compatible software. After cutting, assemble the layers carefully to achieve the desired 3D effect.
- Post-Creation Integration: Incorporate the finished papercut into other media—like shadow boxes, scrapbooks, or photo frames—to enhance the aesthetic of your completed work.
Each step offers opportunities to refine the outcome, ensuring the final piece meets your expectations in terms of detail, size, and style.
How to Seamlessly Integrate This Design Into Your Workflow
Whether you're an educator creating classroom decorations, a small business owner designing promotional items, or a hobbyist exploring new artistic techniques, here's how you can smoothly integrate the Geometric Butterfly 3D Layered Papercut into your process:
For Educators and Workshop Leaders
Use the design as part of a lesson plan on geometry, symmetry, or spatial awareness. The layered nature encourages students to think about how two-dimensional elements create three-dimensional effects. You can also assign group projects where students collaborate to assemble the butterfly and present their interpretations.
For Entrepreneurs and Marketers
Incorporate the butterfly motif into branded merchandise such as gift tags, stickers, or window clings. Its geometric appeal makes it suitable for minimalist or modern aesthetics. By customizing the design with your brand logo or colors, you can turn it into a signature visual element that stands out in a crowded market.
For Home Decor Enthusiasts
Transform the papercut into wall art by mounting each layer on contrasting colored papers or foam board. The 3D effect becomes more pronounced with lighting and spacing between the layers. You could also use it as a focal point in a shadow box display or frame it behind glass for a clean, elegant finish.
For Event Planners and Wedding Designers
These butterflies make excellent centerpieces, backdrop accents, or table numbers when printed and layered. Their geometric style pairs well with modern themes, and the ability to scale them means they can be adapted for any venue size or budget. Pair them with metallic cardstock or patterned vellum for added flair.
Practical Tips for Using the Cutting Files
To ensure a smooth experience when working with the Geometric Butterfly 3D Layered Papercut, consider the following tips:
- Organize Your Layers: Before starting the cutting process, review the design to understand how many layers are involved and how they interlock. Labeling them in your software can prevent confusion during assembly.
- Test on Scrap Material: Especially if you're new to 3D papercuts, test the design on a smaller scale or cheaper material first. This helps identify any issues with registration or alignment before committing to your final medium.
- Choose the Right Paper Thickness: Thicker cardstocks offer durability but may require stronger blades. Thin paper cuts easily but might not hold up under handling. Experiment to find the ideal balance for your project.
- Layering Techniques: To achieve the best 3D effect, space the layers slightly apart. You can use foam dots, adhesive tape, or glue strategically to build depth without obscuring the design.
- Software Compatibility Check: Confirm that your cutting machine's software supports the file types included. If needed, convert the AI or EPS files to SVG or PNG using free online tools or basic design software.
Collaboration and Customization Opportunities
The beauty of the Geometric Butterfly 3D Layered Papercut lies in its adaptability. It’s not just a static design—it’s a foundation for creativity. Here are some ways it interacts with other resources and methods:
When combined with graphic design tools like Canva or Photoshop, the butterfly can become part of a larger visual composition. You can overlay it onto images, add textures, or use it as a background element. For those using Adobe products, the AI and EPS files allow for seamless integration into logos, posters, or brochures.
If you're collaborating with another creator, such as a calligrapher or photographer, the butterfly can serve as a complementary element. Think of it as a visual anchor that ties together different aspects of your project, enhancing cohesiveness and impact.
Efficiency and Long-Term Use Considerations
One of the key advantages of purchasing digital cutting files is the potential for repeated use. As long as you have access to a cutting machine, you can reuse the Geometric Butterfly design in future projects. This is especially valuable for educators or businesses that need consistent visuals across multiple events or products.
For long-term efficiency, store the ZIP file in an organized folder labeled clearly with the design name and date of purchase. Backing up the file to cloud storage ensures accessibility across devices and prevents accidental loss. Additionally, maintaining a list of compatible software and materials will streamline your setup for next time.
Quality Control and Troubleshooting
Even with digital precision, the success of your papercut depends on careful execution. Here’s how to maintain quality throughout the process:
- Check Machine Settings: Ensure blade depth and speed settings match the thickness of your chosen material. Incorrect settings can lead to incomplete cuts or damage to the paper.
- Verify Alignment: When assembling, use a ruler or template to align each layer correctly. Misalignment can disrupt the 3D illusion and reduce the overall impact of the design.
- Review Each Layer Individually: After cutting, inspect every layer for any missed corners or uneven edges. Minor imperfections can accumulate when multiple layers are stacked, affecting the final look.
- Use Quality Adhesives: Choose adhesives that dry clear and won’t wrinkle the paper. Foam squares or double-sided tape are excellent for adding subtle height between layers.
If you encounter issues, remember that support is available. Don’t hesitate to reach out with questions or concerns—you’ll get assistance tailored to your specific situation, ensuring you can complete your project successfully.
Real-World Applications and Outcomes
Let’s explore a few real-world scenarios where the Geometric Butterfly 3D Layered Papercut shines:
Scenario 1: Personalized Wedding Invitations
An event planner uses the AI file to customize the butterfly with the couple’s initials and wedding date. They then cut the design on textured ivory paper and attach it to a matte black card stock base. The final product becomes a standout invitation that blends elegance with a touch of modern artistry.
Scenario 2: Classroom Art Project
A teacher downloads the SVG version and imports it into Silhouette Studio. After resizing it for student use, she prints the layers on colored paper and guides her class in assembling them. The project teaches spatial reasoning and attention to detail while allowing room for individual creativity.
Scenario 3: Brand Packaging Accents
A boutique owner integrates the DXF file into their packaging design. The butterfly is cut from metallic silver cardstock and adhered to tissue paper inserts inside gift boxes. This subtle yet stylish addition reinforces the brand’s identity and leaves a lasting impression on customers.
Why Choose This Design?
There are countless reasons why the Geometric Butterfly 3D Layered Papercut is worth considering for your next project:
- It’s versatile, supporting a wide range of applications from home décor to commercial branding.
- Its geometric style appeals to modern tastes and pairs well with minimalist or abstract themes.
- The multiple file formats provide flexibility for users with different software setups.
- It requires minimal effort to produce stunning results, especially with the right cutting machine.
Moreover, the design encourages creativity beyond the initial cut. It invites experimentation with colors, materials, and presentation styles, making it a great resource for anyone looking to expand their artistic repertoire.
Getting Started: A Quick Workflow Example
Here’s a simple example of how to implement the Geometric Butterfly 3D Layered Papercut in your workflow:
- Download the ZIP file and extract the contents.
- Open the preferred file (e.g., SVG) in your cutting machine software.
- Adjust the size according to your project requirements.
- Select the appropriate material and load it into your machine.
- Send the job to your cutting machine and wait for the layers to be cut.
- Once cut, sort the layers and begin assembling them using foam adhesive or tape.
- Mount the final piece on a backing board or incorporate it into your project.
This streamlined approach ensures you get from idea to finished product efficiently, with minimal steps required to maintain quality and consistency.
Final Thoughts
The Geometric Butterfly 3D Layered Papercut is more than just a design—it’s a tool that enhances your creative possibilities. Whether you're crafting for a special occasion, teaching a design class, or building a brand, this product offers a structured yet flexible way to incorporate beautiful, dimensional artwork into your work.
By understanding how to prepare, execute, and organize your workflow around this design, you unlock a powerful asset for your projects. And if you ever need guidance or clarification, support is readily available to help you succeed.
Explore the potential of the Geometric Butterfly 3D Layered Papercut today and let it inspire your next creation. Follow the shop to stay updated on future releases and continue expanding your creative toolkit. Thank you for visiting—and don’t forget to share your finished projects!